
embulk-output-mongodb 플러그인이 공식사이트에서 링크가 죽었군요. gem repository 에서 install은 가능하지만, 회사에서 사용하기 좀 뭐 해서 그냥 만들어 봤습니다. 참.. 쉽네요 😉
개발 방법
- embulk 신규 프로젝트 생성
- 프로젝트 빌딩
- 작업결과 확인
- mongodb client 코드 작성
1. embulk로 신규 프로젝트 생성
embulk가 기본적인 플러그인 프로젝트의 템플릿 코드 및 프로젝트 자체를 만들어 줍니다. 상당히 간편하더군요. java와 ruby 두가지이니 입맛에 맞게 선택해서 만들면 되구요. 저는 java로 만들어 봤습니다.
아래 명령으로 간단히 생성 됩니다.
1
$ embulk new <type> <name>
type은 아래와 같습니다.
| type | description | example |
|---|---|---|
| java-input | Java record input plugin | mysql |
| java-output | Java record output plugin | mysql |
| java-filter | Java record filter plugin | add-hostname |
| java-file-input | Java file input plugin | ftp |
| java-file-output | Java file output plugin | ftp |
| java-parser | Java file parser plugin | csv |
| java-formatter | Java file formatter plugin | csv |
| java-decoder | Java file decoder plugin | gzip |
| java-encoder | Java file encoder plugin | gzip |
| ruby-input | Ruby record input plugin | mysql |
| ruby-output | Ruby record output plugin | mysql |
| ruby-filter | Ruby record filter plugin | add-hostname |
| ruby-parser | Ruby file parser plugin | csv |
| ruby-formatter | Ruby file formatter plugin | csv |
java output plugin을 만들거니 다음과 같이 입력하였습니다.
1
$ embulk new java-output embulk_nest
plugin 명칭을 “embulk_nest”로 잡았습니다. 나중에 실행시킬때는 “embulk-output-embulk_nest”로 될 것이기에, 중간에 “_“를 넣었습니다.
2. 프로젝트 빌딩
간단히 프로젝트가 생성되면, 다음 명령을 통해 빌딩할 수 있습니다.
1
2
$ cd embulk-output-embulk_nest
$ ./gradlew package
gradle을 사용하고 있어서 intellij에서 직접하려 했는데, 세팅이 잘 안 맞네요. 그냥 커맨드 라인에서 작업하는 것이 편합니다.
3. 작업 결과 확인
패키지가 만들어졌으면 작업 내용을 확인할 수 있습니다.
1
$ embulk run -L ./embulk-output-mongodb_nest config.yml
config.yml을 대충 만들어서 돌려보니 그냥 잘 돌아 갑니다. 물론 아무 작업도 안하지만서도..
여기까지 됐으면 거의 끝났다고 보면 됩니다.
4. mongodb client 코드 작성
MongodbNestOutputPlugin.java 수정
사실 mongodb를 사용해 보지 않아서 오히려 여기부터 좀 시간을 잡아먹었습니다. 애초부터 mysql같은 플랫한 데이터를 sub document가 가능하게 mongodb로 넣기 위한 작업이었기에 좀 헤맸네요. 아무튼 아래 소스에 코딩을 시작하면 됩니다.
1
파일 위치 : src/org/embulk/*
실제 수정할 파일은 다음과 같이 만들어져 있네요.
1
src/main/java/org/embulk/output/mongodb_nest/MongodbNestOutputPlugin.java
탬플릿에는 몇개의 메소드와 인터페이스가 만들어져 있습니다.
| 메소드 | 기능 |
|---|---|
| PluginTask | config.yml의 설정값을 입력받기 위한 인터페이스 |
| transaction | transaction을 수행하기 위한 기본 메소드 |
| resume | resume을 구현하기 위한 메소드 |
| cleanup | cleanup을 구현하기 위한 메소드 |
| open | 실제 output plugin의 작업을 수행하기 위한 메소드 |
mongodb의 기본적인 설정 정보를 담기 위해 PluginTask interface를 다음과 같이 수정하였습니다.
1
2
3
4
5
6
7
8
9
10
11
12
13
14
15
16
17
18
19
20
21
22
23
24
25
26
27
28
29
30
31
32
33
34
35
36
37
38
39
40
41
42
43
 public interface DefineChildDocument extends Task
   {
      @Config("name")
      public String getName();

  @Config("field")
      public String getField();
  }

   public interface PluginTask extends Task
   {
      @Config("collection")
      public String getCollection();

  @Config("host")
      public String getHost();

  @Config("port")
      @ConfigDefault("27017")
      public int getPort();

  @Config("database")
      public String getDatabase();

  @Config("user")
      public String getUser();

  @Config("password")
      public String getPassword();

  @Config("key")
      public String getKey();

  @Config("child")
      @ConfigDefault("null")
      public Optional<List<DefineChildDocument>> getChild();

  @Config("bulk_size")
      @ConfigDefault("1000")
      public int getBulkSize();

  }
참고할 점은 선택 옵션인 경우는 “@ConfigDefault”를 작성해 주면 된다는 것입니다. 없는 경우는 필수 항목이 되어 반드시 config.yml에 있어야 합니다. 주의할 것은, 선택항목인데, 기본값이 필요 없는 경우는 “null”로 주면 됩니다. “” 이런식으로 주면 에러가 나더군요
mongodb 접속 정보를 url로 입력할 수도 있는데, 문제는 ‘@’와 같은 특수문자가 기본 정보에 들어 있으면 mongodb client에서 에러가 납니다. url encoding을 하면 되는데, 좀 더 편리하게 하려고, 필드들을 모두 잘라서 입력하도록 했습니다.
기본적인 접속 정보와 함께, child라는 필드를 추가했습니다. nested 되는 도큐멘트를 정의하기 위함이구요. name으로 sub document 필드명을, field로 input에서 받은 필드명을 입력하도록 하였습니다. 같은 name이 설정될 경우는 하나의 sub document에 들어가도록 구성하였습니다.
두번째로 bulk_size를 만들었는데, 시스템 자원에 따라 알아서 쓰면 되겠지요.
config는 잡았으니.. 실제 수행할 몸체를 구현하면 되겠지요.
open 메소드를 아래와 같이 수정하였습니다.
1
2
3
4
5
6
7
@Override
public TransactionalPageOutput open(TaskSource taskSource, Schema schema, int taskIndex)
{
   PluginTask task = taskSource.loadTask(PluginTask.class);

 return new PluginPageOutput(task, schema);
}
PluginPageOutput.java 추가
PluginPageOutput 클래스는 TransactionalPageOutput 클래스를 상속받아 아래와 같이 구현하였습니다.
1
2
3
4
5
6
7
8
9
10
11
12
13
14
15
16
17
18
19
20
21
22
23
24
25
26
27
28
29
30
31
32
33
34
35
36
37
38
39
40
41
42
43
44
45
46
47
48
49
50
51
52
53
54
55
56
57
58
59
60
61
62
63
64
65
66
67
68
69
70
71
72
73
74
75
76
77
78
79
80
81
82
83
84
85
86
87
88
89
90
91
92
93
94
95
96
97
98
99
100
101
102
103
104
105
106
107
108
109
110
111
112
113
114
115
116
117
118
119
120
121
122
123
124
125
126
127
128
129
130
131
132
133
134
135
136
137
138
139
140
141
142
143
144
145
146
147
148
149
150
151
152
153
154
155
156
157
158
159
160
161
162
163
164
165
166
167
168
169
package org.embulk.output.mongodb_nest;

import com.mongodb.BasicDBObject;
import com.mongodb.client.MongoClient;
import com.mongodb.client.MongoClients;
import com.mongodb.client.MongoCollection;
import com.mongodb.client.MongoDatabase;
import com.mongodb.client.model.ReplaceOneModel;
import com.mongodb.client.model.ReplaceOptions;
import com.mongodb.client.model.WriteModel;
import org.bson.Document;
import org.embulk.config.TaskReport;
import org.embulk.spi.*;
import org.embulk.spi.time.Timestamp;
import org.slf4j.Logger;

import java.io.UnsupportedEncodingException;
import java.net.URLEncoder;
import java.util.ArrayList;
import java.util.Date;
import java.util.List;
import java.util.Map;

public class PluginPageOutput implements TransactionalPageOutput
{
   private static final Logger logger = Exec.getLogger(MongodbNestOutputPlugin.class);

 private final MongodbNestOutputPlugin.PluginTask task;
 private final Schema                             schema;
 private final PageReader                         pageReader;

 private MongoClient               mongo;
 private MongoDatabase             db;
 private MongoCollection<Document> collection;

  PluginPageOutput(MongodbNestOutputPlugin.PluginTask task, Schema schema)
   {
      this.pageReader = new PageReader(schema);
 this.schema = schema;
 this.task = task;

  String connectionStr = "mongodb://";

 if (task.getUser() != null)
      {
         connectionStr += task.getUser();
 try  {
            connectionStr += ":" + URLEncoder.encode(task.getPassword(), "UTF-8") + "@";
  }
         catch (UnsupportedEncodingException e)
         {
            e.printStackTrace();
  }
      }

      connectionStr += task.getHost() + ":" + task.getPort() + "/" + task.getDatabase();

 this.mongo = MongoClients.create(connectionStr);
 this.db = this.mongo.getDatabase(task.getDatabase());
 this.collection = this.db.getCollection(task.getCollection());
  }

   @Override public void add(Page page)
   {
      pageReader.setPage(page);
  List<WriteModel<Document>> replaceModel = new ArrayList<>();

 while (pageReader.nextRecord())
      {
         BasicDBObject doc = new BasicDBObject();

 for (int i = 0; i < schema.getColumnCount(); i++)
         {
            String t = schema.getColumnName(i);
  Class<?> type = schema.getColumnType(i).getJavaType();

 if (pageReader.isNull(i))
            {
               doc.append(t, null);
  }
            else if (type.equals(boolean.class))
            {
               doc.append(t, pageReader.getBoolean(i));
  }
            else if (type.equals(double.class))
            {
               doc.append(t, pageReader.getDouble(i));
  }
            else if (type.equals(long.class))
            {
               doc.append(t, pageReader.getLong(i));
  }
            else if (type.equals(String.class))
            {
               doc.append(t, pageReader.getString(i));
  }
            else if (type.equals(Timestamp.class))
            {
               doc.append(t, new java.sql.Timestamp(pageReader.getTimestamp(i).toEpochMilli()));
  }
         }

         if (task.getChild() != null)
         {
            doc = transformDocument(doc);
  }

         replaceModel.add(new ReplaceOneModel<>(
               new Document(task.getKey(), doc.get(task.getKey())),
 new Document(doc),
 new ReplaceOptions().upsert(true))
         );

 if(replaceModel.size() % task.getBulkSize() == 0)
         {
            collection.bulkWrite(replaceModel);
  replaceModel.clear();
  }
      }

      if (replaceModel.size() > 0)
      {
         collection.bulkWrite(replaceModel);
  }

   }

   private BasicDBObject transformDocument(BasicDBObject doc)
   {
      for (MongodbNestOutputPlugin.DefineChildDocument cd : task.getChild().get())
      {
         String name = cd.getName();
  String field = cd.getField();

  BasicDBObject subdoc = new BasicDBObject();
  Object exists = doc.get(name);

 if (exists != null)
         {
            subdoc.putAll((Map) exists);
  }

         subdoc.append(field, doc.remove(field));
  doc.append(name, subdoc);
  }

      return doc;
  }

   @Override public void finish()
   {

   }

   @Override public void close()
   {
      this.mongo.close();
  }

   @Override public void abort()
   {

   }

   @Override public TaskReport commit()
   {
      return null;
  }
}
음.. 이노무 블로그는 소스 폴딩이 안돼!! 누가 도움 좀.. :sob:
TransactionalPageOutput 클래스를 상속받아 코드를 생성하여, 몇몇 필수 메소드를 override하여 작성합니다.
생성자에서 mongodb에 접속하도록 하였고, add method에서 필요한 작업을 수행했습니다.
sub document를 만들기 위해, transformDocument 메소드를 추가해서 구조를 변형하였습니다.
사실, 코딩 능력이 일천하여 하나하나 설명하기가 좀.. 그러네요. (뭐.. 나만 알면 되지~ :kissing_smiling_eyes:
config.yml 작성
테스트를 위해서, embulk의 샘플 csv를 input으로하여 작성해 봤습니다.
1
2
3
4
5
6
7
8
9
10
11
12
13
14
15
16
17
18
19
20
21
22
23
24
25
26
27
28
29
30
31
32
33
34
35
36
in:
  type: file
  path_prefix: /Users/focuschange/google/program/embulk/./try1/csv/sample_
  decoders:
  - {type: gzip}
  parser:
    charset: UTF-8
    newline: LF
    type: csv
    delimiter: ','
    quote: '"'
    escape: '"'
    null_string: 'NULL'
    trim_if_not_quoted: false
    skip_header_lines: 1
    allow_extra_columns: false
    allow_optional_columns: false
    columns:
    - {name: id, type: long}
    - {name: account, type: long}
    - {name: time, type: timestamp, format: '%Y-%m-%d %H:%M:%S'}
    - {name: purchase, type: timestamp, format: '%Y%m%d'}
    - {name: comment, type: string}
out:
  type: mongodb_nest
  host: 999.999.999.999
#  port: 27017
  database: focus
  user: focus
  password: focus@123.456.789
  collection: PluginTest
  key: account
  child:
  - {name: mychild, field: time}
  - {name: yourchild, field: comment}
  - {name: mychild, field: purchase}
실제 로컬에서 수행해 보니, mongodb에 다음과 같이 들어갑니다.
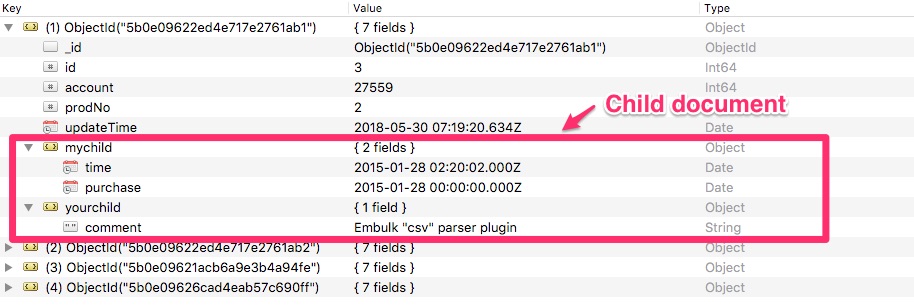
child 필드로 작성한 mychild, yourchild 모두 잘 들어갔네요. 아무튼 간단히 작성해서 테스트 해 보니 잘 들어갑니다.
5. 배포
하는김에 젬 배포까지 해 봤습니다. https://rubygems.org 에 가입하고, console에서 배포하기 위해 인증까지 받았습니다.
console 인증은 그냥 다음처럼 했습니다.
1
2
3
4
5
6
7
8
9
 $ gem push
Enter your RubyGems.org credentials.
Don't have an account yet? Create one at https://rubygems.org/sign_up
   Email:   focuschange@gmail.com
Password:

Signed in.
ERROR:  While executing gem ... (Gem::CommandLineError)
    Please specify a gem name on the command line (e.g. gem build GEMNAME)
email과 암호를 입력하니 siged in 성공하고, “~/.gem/credentials” 파일이 생성됩니다. 뭐.. 다음 에러야 무시하고.. 인증받았으면 됐고~
아래 명령으로 gem push 하면 빌딩 및 배포가 이루어집니다,
1
2
3
4
5
6
7
8
9
10
11
12
$ ./gradlew gemPush
....
....
> Task :gem
  Successfully built RubyGem
  Name: embulk-output-mongodb_nest
  Version: 0.1.0
  File: embulk-output-mongodb_nest-0.1.0.gem

> Task :gemPush
Pushing gem to https://rubygems.org...
Successfully registered gem: embulk-output-mongodb_nest (0.1.0)
필요한 모듈들 다운받아 패키징하고, 위에 메세지처럼 gem에 올라가네요.
https://rubygems.org 에서 검색해보니, 나옵니다. 와~~
6. 결론
embulk는 사용하면 할 수록 참 편하다는 생각이 드네요. custom도 상당히 쉬운 편이구요. 아직 몽고DB를 능숙하게 사용하지 못하기 때문에, 코드가 좀 지저분하지만, 점진적으로 가다듬으면 쓰는데 나쁘지 않을 것 같습니다. 오히려 회사에서 방화벽 열고, 이것저것 준비하는 시간이 더 걸립니다.
참고
- 소스코드 : https://github.com/focuschange/embulk-output-mongodb_nest
- ruby gem : https://rubygems.org/gems/embulk-output-mongodb_nest
- embulk customization : http://www.embulk.org/docs/customization.html